How it works
From install to every ad platform, step by step
dataMonitorio builds the dataLayer. Google Tag Manager sends it on. Here's the whole path, with nothing hidden.
Setup
Guided setup, from install to a tested order
Step 1
Install the app
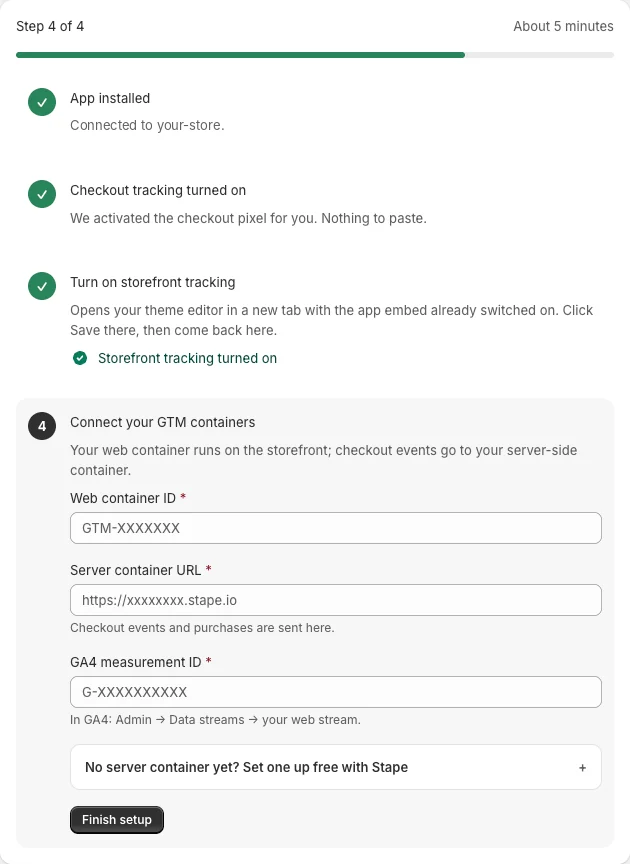
Install from the Shopify App Store. Checkout tracking turns on by itself, and guided setup walks you through the rest: your ad platforms, your cookie banner, Tag Manager and your server container. Nothing to paste.
- Checkout pixel connected automatically
- Guided setup inside the app, in three stages: connect, add your tags, test
- Shows the minutes left: about 20 for a typical store
Step 2
Turn on storefront tracking
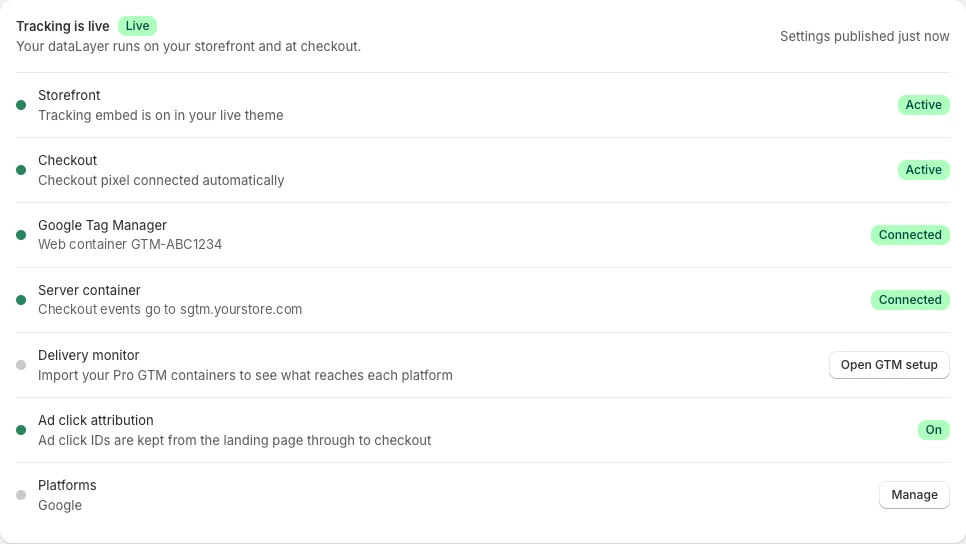
Switch on the dataMonitorio app embed in your theme editor and save. Every storefront page now has a dataLayer, and the app home shows it as active.
- A theme app embed, so no theme code is edited
- Loads your GTM web container
- Status shown on the app home page
Step 3
Add your ready-made tags
Enter your platforms' IDs in the Platform IDs step. dataMonitorio builds a web and a server container for its events, and you import both into Google Tag Manager. Growth and Pro; on Free, you use your own tags.
- Web container for storefront tags
- Server container for checkout tags
- Consent checks built in
- web-container.jsonStorefront tags: GA4, Meta, TikTok…
- server-container.jsonCheckout tags and Conversions APIs
Import into Google Tag Manager → Merge → Publish
Growth + Pro
Step 4
Test with one order
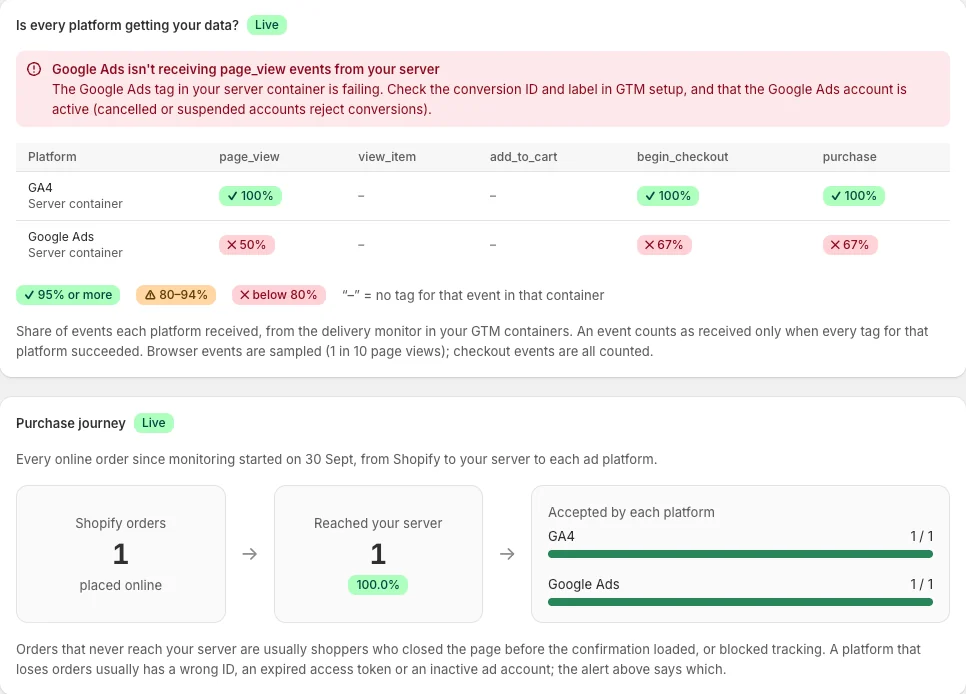
Place a test order and see, event by event, that every platform you set up got it. On Pro, Analytics (the delivery monitor) then keeps watching and emails you if a platform stops.
- Quick test in about 3 minutes, Full test in about 10
- Each problem says what happened and how to fix it
- Pro: delivery for every platform, and email alerts with the likely cause
What gets tracked
The events ad platforms need
Each event is sent in the format each platform's tags expect, from the first page view to the purchase.
| Event | Where | What it's for |
|---|---|---|
| Storefront | ||
page_view | Storefront | Every page visit, with click IDs and consent state |
view_item_list | Storefront | Collection pages, for catalog and remarketing |
select_item | Storefront | A product clicked in a collection or search results |
view_item | Storefront | Product page views, for remarketing |
view_search_results | Storefront | Searches and what they returned |
add_to_cart | Storefront | Items added to the cart, from any theme or cart drawer |
remove_from_cart | Storefront | Items removed from the cart |
view_cart | Storefront | The cart page |
sign_up | Storefront | New customer accounts |
login | Storefront | Customer logins |
generate_lead | Storefront | Contact and newsletter forms |
| Checkout | ||
begin_checkout | Checkout | Checkout started |
add_contact_info | Checkout | Contact details entered |
add_shipping_info | Checkout | Shipping step completed |
add_payment_info | Checkout | Payment details submitted |
purchase | Checkout | Completed order with value, items and customer data |
| After checkout (Pro) | ||
post_purchase | After checkout | Items an upsell app or your staff add to an order after checkout, with their own transaction ID. GA4 gets a custom event; ad platforms get a Purchase |
refund | After checkout | Refunds and cancellations of the original order, for GA4 |
post_purchase_refund | After checkout | Refunds of upsell items, for GA4 |
subscription_purchase | After checkout | Subscription renewal orders, for GA4 (beta) |
subscription_refund | After checkout | Refunds of renewal orders, for GA4 (beta) |
Attribution
The ad click survives all the way to the sale
Ad click IDs from Google, Meta, TikTok, Microsoft and the other platforms are kept for up to 90 days, with advertising consent, so each purchase can be credited to the ad that earned it.
gclid · fbclid · ttclid
page_view
view_item
add_to_cart
begin_checkout
purchase
Under the hood
Two places, one dataLayer
Storefront
A Shopify theme app embed adds the dataLayer and loads your GTM web container on every page.
- Turned on in the theme editor
- Loads your GTM web container
- Optional: load GTM from your own domain
Checkout
Shopify's app pixel sends checkout events to your GTM server container, where your platform tags run.
- Connected automatically on install
- Events sent to your server container, ideally on your own subdomain
- Respects each shopper's consent
- On Pro, upsells, refunds and renewals after checkout go to the same container
How long does setup take?
Guided setup shows how many minutes are left: about 20 for a typical store with a few ad platforms, including importing your tags and a test order. The guides walk you through each step.
Do I need to know Google Tag Manager?
It helps, but you don't need to build tags. The containers are ready-made: you import them, check them in Preview and publish.
Where is my server container hosted?
With any provider you choose; we recommend Stape. A free plan with the host's own address works for getting started. For first-party tracking, connect your own subdomain (for example sgtm.yourstore.com, also possible on Stape's free plan), and move to a paid plan before you reach the free monthly limit. dataMonitorio never hosts your container.
Can I keep my existing GTM setup?
Yes. The first time, import with Merge → Rename conflicting, so your existing tags stay. When you update, use Merge → Overwrite: it replaces only dataMonitorio's “dM -” items. Remove anything of your own that duplicates the new tags.
Ready to see every sale?
Join the waitlist and be first to try dataMonitorio when it launches on the Shopify App Store.
- Free plan available
- Billed through Shopify
- No code to paste